

This is the easiest no knead pizza dough recipe you'll ever make! No kneading or fancy equipment necessary, this will become your go-to pizza recipe. Follow my step by step instructions and tips for the perfect pizza every time! About eight months ago I was introduced to no knead pizza dough. All thanks to my dear work colleague, Elaine. This pizza dough is a total game changer and once you've tried it there's no turning back.
You've probably all heard of or tried no knead bread made famous by Jim Lahey. Well, I never considered that the same technique could be applied to pizza.
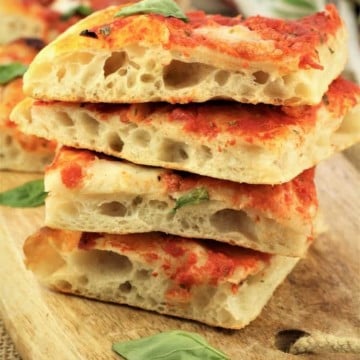
What's not to love about this amazing dough (also known as lazy pizza dough)? It's fluffy on the inside, crisp on the outside. It requires no special tools to prepare other than a bowl and wooden spoon and requires absolutely no kneading! All you need is patience 'cause this dough needs to rise for a minimum of six hours and up to twenty four hours.
With this easy to make pizza dough recipe, you don't have to wait until the weekend to enjoy pizza! Stir all the ingredients for your dough in the morning and make pizza that same night for dinner or the following day.
This pizza dough reminds me of my mom's pizza. She has always made rectangular shaped pizza on sheet pans similar to this, only with a lot more kneading involved! I'm glad to say she approves of this recipe.
I did previously share a regular, kneading required pizza dough recipe that also works well. You can check out that post here as well as get a glimpse at my outdoor wood burning pizza oven!
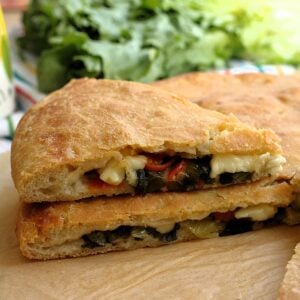
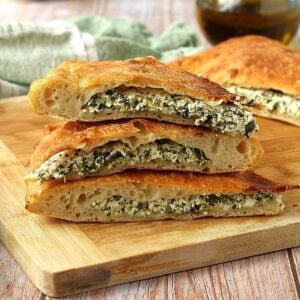
It took me several months to experiment with and fine tune this recipe and I am finally satisfied enough to share this amazing, no fail recipe with you! But you can do so much more with this dough other than make pizza. Here are a few options: olive and cheese buns; parigina pizza; scacciata with potatoes and sausage; scacciata with cauliflower; skillet focaccia bread; chicory, egg and cheese stuffed pizza; and fried pizza dough.
Before we get to my step by step instructions, allow me to share some information that will be helpful for you when making this dough.
Here's all you need to make the Easiest No Knead Pizza Dough Recipe!

All-purpose flour: just regular all-purpose flour will do, no fancy flour necessary. Part of the white flour may be substituted with whole wheat flour. You will probably have to add a bit more water to make a soft, sticky dough.
Yeast: I used ½ teaspoon of active dry yeast.
Salt: regular table salt.
Olive oil
and of course water!
A few notes about when to add the salt and oil to the dough:
You'll notice that unlike other pizza dough recipes, I stir the salt and oil into the dough at the end. Why is that? My pizza dough education is far from over, and so I've been reading up on the pizza making methods of the famous Roman pizza chef Gabriele Bonci. He stirs the salt and oil into the dough after the flour, yeast and water have been combined.
Salt retains water and therefore the flour absorbs the water much easier without the salt mixed in. I tested both methods, stirring the salt into the flour mixture right away and adding it afterward. Although both methods work, I agree the dough comes together much easier with the salt added at the end.
Unlike most other no knead pizza doughs, I add olive oil to mine. It offers a more tender texture that I prefer. Also, since oil is hydrophobic and doesn't mix well with water, it is better absorbed into the dough at the end. My son's food science class has paid off!
How long does this dough need to rise?
You can bake this pizza after a minimum of 6 hours . Scroll down further below for a photo of the dough after 6 hours. You'll notice that the dough is bubbly and doubled in bulk. So this means you can mix the dough in the morning and have pizza that same night for dinner!
But if you're not in a rush to have your pizza, let it rise for a full 24 hours. An overnight pizza dough will rise much more, be extra bubbly and, in my opinion, is more flavorful. This is a very forgiving dough. Basically you have a window of opportunity from 6-24 hours to bake your dough.
You do have one more option! Let's say you've prepared the dough and changed your mind about having pizza the next day. Simply shape the risen dough into a ball, as shown below, wrap well and place in your fridge for up to 3 days. So many options!
Can no knead pizza dough be frozen?
You can definitely freeze this pizza dough. After it rises proceed to shape into a ball, as shown below, then place in freezer bags and freeze for up to 3 months.
But to be quite honest with you, this dough is so easy to make and not really worth the effort of freezing it. In the time it takes you to defrost the dough and bring it to room temperature, you can make a fresh batch!
Can I double this recipe?
Due to the soft, sticky texture of this dough, I prefer making two batches in two separate bowls. I find it easier to handle a smaller dough.
How many pizzas does this recipe make?
This recipe will make one rectangular pizza, approximately 10x16 inches. Or you can divide the dough in half to make 2 -12 inch pizzas which I have done when using my pizza stone.
What type of pan is best for baking no knead pizza dough?
Just about any pan will do! I have baked this pizza on basic rectangular baking sheets; a perforated aluminum pizza pan; a pizza stone and even in my outdoor wood burning oven and I had success each time!
Keep in mind that your baking time may vary slightly according to the pan you use. And of course it bakes much faster in a 700 degrees F wood pizza oven!
Here are a few things to keep in mind:
If you're using a baking sheet be sure to grease it generously with olive oil to prevent sticking.
If using a pizza stone, don't forget to preheat the oven with the pizza stone inside it. Dust the pizza stone with cornmeal or semolina flour to prevent it from sticking. My best practice is to lift the dough directly onto the pizza before adding my toppings. 
So now that we've gotten all this important information out of the way, let's proceed to make the dough. You'll find the complete printable recipe card at the end of this post.
Step by Step Instructions
In a large mixing bowl stir together the flour and yeast. Heat water until barely warm. Make a well in the center of the flour and slowly pour in the water while stirring with a wooden spoon.
Stir until the flour is almost completely incorporated, then sprinkle the salt over the dough as well as the olive oil. Continue stirring until both ingredients are fully incorporated in the dough, scraping down the sides of the bowl with the wooden spoon to gather all of the flour.
 This step was completely done using only a wooden spoon. However, if you wish, you can reach in with your hands to combine all the ingredients well. You do not need to knead the dough. It will very sticky and not smooth at all. This is fine. Cover with plastic wrap and place in a warm part of your kitchen that is free of any drafts such as your unlit oven. Let sit for 6-24 hours.
Here's what your dough will look like after only 6 hours. Check out those bubbles! You can now prepare your dough for baking or forget about it until the next day.
After 24 hours, this is what the dough will look like. You can see that it has increased in volume compared to the 6 hour dough. It has bubbles and is very soft, sticky and jiggly.
Use a spatula to scrape the dough onto a generously floured surface. Do not over handle the dough. It will be light, airy and bubbly and we want to maintain that texture! Fold over the 2 side edges toward the center of the dough as shown. 
Next, fold the top and bottom edges toward the center. Gather the dough to form a ball with the seam side down.
Lightly oil the same bowl you used for the rising period and gently place the ball of dough in the bowl. Cover tightly with plastic wrap and let sit for 1 hour. You are now ready to shape your pizza! Place the dough on your well floured surface and gently flatten the dough into a large rectangle. Use your finger tips to press down and spread the dough to shape into a large rectangle. Flour your hands as needed. No rolling pin is necessary.
If you're using a pizza stone or round baking pans, divide the dough in 2. Shape each half into a ball, then flatten into a circular shape to make 2 -12 inch pizzas.
Grease a rectangular baking pan well with olive oil. Pick up the dough and place on the pan. Spread it out by applying gentle pressure with your finger tips until it covers most of the pan. Cover with a clean dish cloth while you preheat your oven to 500 degrees F and prepare your toppings.
To prepare a basic tomato sauce: place ¾ cup of canned crushed tomatoes (preferably from Italy!) in a bowl. Add 1 tablespoon olive oil, 1 crushed garlic clove, 1 teaspoon dry oregano, salt (to taste) and a pinch of red pepper flakes (optional). Stir well.
Add toppings: When the oven has reached 500 degrees F, remove the garlic clove and evenly distribute the sauce over the dough. Dot with pieces of mozzarella (if using mozzarella balls packaged in water). Due to the high moisture level, this mozzarella will not burn easily. If using regular shredded mozzarella, add only in the last 5 minutes of baking to prevent it from burning.
To bake: Place the pizza on the bottom rack and bake for 11-12 minutes until the cheese is melted and the dough is crusty and golden. Lift the dough with a spatula to verify if it is well cooked underneath. If the cheese is sufficiently melted and your crust is not browned enough, tent lightly with foil and return to the oven for a few more minutes.
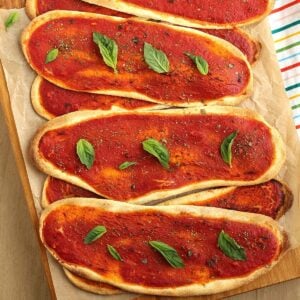
Remove from the oven, top with fresh basil leaves and drizzle lightly with olive oil (if desired). Cut into squares and enjoy!
Tips and suggestions:
- This dough does not have the same texture as regular pizza dough recipes that require kneading. It is a high hydration dough thus making it quite sticky to handle. This is absolutely normal! When handling the dough, be sure to generously flour your work surface and your hands in order to gently shape it. It may require some patience at first!
- I opted to make a basic Margherita pizza but you can add toppings of your choice on this pizza dough. Just be sure to not overload the dough with toppings. You don't want a heavy, soggy pizza!
- Refer to the full text in my post offering detailed information regarding rising times; choice of baking pans; pizza size; and freezing options.
Now that you have all the information that you need to make your own no knead pizza dough, let me know if you give it a try! You can comment and rate the recipe below. Stay tuned for more recipes using the easiest no knead pizza dough recipe. Buon appetito!
Easiest No Knead Pizza Dough Recipe
Ingredients
For the dough
- 3 cups all-purpose flour
- ½ teaspoon active dry yeast
- 1 ½ cups water just barely warm
- 2 teaspoon salt
- 1 tablespoon olive oil
Basic pizza sauce
- ¾ cups canned crushed tomatoes
- 1 tablespoon olive oil
- 1 clove garlic crushed
- 1 teaspoon dry oregano
- salt to taste
- pinch red pepper flakes optional
Other toppings
- 100 grams fresh mozzarella packaged in water or as much as you like!
- fresh basil leaves for garnishing
- drizzle olive oil
Instructions
For the dough
- In a large mixing bowl stir together the flour and yeast. Heat the water until barely warm. Make a well in the center of the flour and slowly pour in the water while stirring with a wooden spoon.
- Stir until the flour is almost completely incorporated, then sprinkle the salt over the dough as well as the olive oil. Continue stirring until both ingredients are fully incorporated in the dough, scraping down the sides of the bowl with the wooden spoon to gather all of the flour. This should only take about a minute.
- This step was completely done with only my wooden spoon. However, if you wish you can reach in with your hands to mix all the ingredients well. You do not need to knead the dough. It will be very sticky and not at all smooth. This is fine. Cover with plastic wrap and place in a warm part of your kitchen that is free of any drafts such as your unlit oven. Let sit for 6-24 hours.
- Anytime between 6-24 hours you can bake your dough. It will have increased in volume, will be bubbly, sticky and jiggly. Use a spatula to scrape the dough onto a generously floured surface. Do not over handle the dough or attempt to knead it.
- Fold over the 2 side edges toward the center of the dough. Then fold the top and bottom edges toward the center. Gather the dough to form a ball with the seam side down.
- Lightly grease the same bowl you used for the rising period, gently place the ball of dough in the bowl. Cover tightly with plastic wrap and let sit for 1 hour.
- Place the dough on your well floured surface and gently flatten the dough into a large rectangle. Use your finger tips to press down and spread the dough to shape into a large rectangle. Flour your hands as needed. No rolling pin is necessary.
- If you're using a pizza stone or round baking pans, divide the dough in 2. Shape each half into a ball, then flatten into a circular shape to make 2 -12 inch pizzas.
- Grease a rectangular baking pan (approximately 10x16 inches) generously with olive oil. Pick up the dough and place on the pan. Spread it out by applying gentle pressure with your finger tips until it covers most of the pan. Cover with a clean dish cloth while you preheat your oven to 500 degrees F and prepare your toppings.
For the basic tomato sauce
- Place all ingredients for the tomato sauce in a bowl and stir to combine.
Add toppings to the pizza
- When the oven has reached 500 degrees F, remove the garlic clove from the sauce and evenly distribute over the dough. Dot with pieces of mozzarella (if using mozzarella balls packaged in water). Due to the high moisture level, this mozzarella will not burn easily. If using regular shredded mozzarella, add only in the last 5 minutes of baking to prevent it from burning.
To bake
- Place the pizza on the bottom rack and bake for 11-12 minutes until the cheese is melted and the dough is crusty and golden. Lift the dough with a spatula to verify if it is well cooked underneath. If the cheese is sufficiently melted and your crust is not browned enough, tent lightly with foil and return to the oven for a few more minutes.
- Remove from the oven, top with fresh basil leaves and drizzle lightly with olive oil (if desired). Cut into squares and enjoy!
Notes
- This dough does not have the same texture as regular pizza dough recipes that require kneading. It is a high hydration dough thus making it quite sticky to handle. This is absolutely normal! When handling the dough, be sure to generously flour your work surface and your hands in order to gently shape it. It may require some patience at first!
- I opted to make a basic Margherita pizza but you can add toppings of your choice on this pizza dough. Just be sure to not overload the dough with toppings. You don't want a heavy, soggy pizza!
- Refer to the full text in my post offering detailed information regarding rising times; choice of baking pans; pizza size; and freezing options.
- Please note that the nutritional information provided is approximate and may vary according to ingredients used and exact portion size.

DebC
We love no knead bread and I would very much like to try the no knead pizza dough instead of my usual pizza dough recipe! Would this no knead pizza dough work if I par-baked the crust for around 5 minutes at 450 degrees, cooled completely and then added toppings in order to make homemade frozen pizzas with a crispy crust after baking from frozen?
Nadia
Hi Deb, that is a great question and I like this idea of making homemade frozen pizzas. But I must be honest I have not tried this myself and therefore can not offer feedback nor guarantee the results. However, this dough is so easy to prepare that I think it would be worthwhile experimenting with this idea. In fact I will try it myself as soon as I can and if it works I'll update the recipe with this suggestion. Thank you for this idea, and if you happen to try it out before I do, please do let me know how it turned out. Thanks again!
Paolo
Salt also holds water from the yeast, thus slowing down the fermentation. Not to mention it simply kills those poor things, so close contact never works good for them. And now on to the recipe 🙂 I'm so much looking forward to it.
Nadia
Thank you Paolo for this, and I do hope you enjoy the recipe! Please let me know how it turns out!
Antonella Lippis
can you use this dough to fry and make pizza fritta?
Nadia
Hi Antonella, you definitely can! In fact I posted that recipe here: https://www.mangiabedda.com/fried-pizza-dough-pizza-fritta/. Hope you enjoy it!
Donna Calvo
This is the best no knead pizza dough EVER!!! It not only is easy to prepare, it is delicious as well. It is my go to recipe to make "Grandma's" pizza.
Nadia
Hi Donna, I'm so glad you enjoyed this wonderful pizza recipe! It's a game changer for sure and I don't use any other recipe, it's too easy. Thank you for your comment!
Maggie
I love love this pizza recipe. I let it sit 24 hours. Everyone loved it so much that I started another batch of dough to make more and freeze some for the future. I added rocket to my topping. I thank you so much for this recipe...........................Maggie 🙂
Nadia
Hello Maggie, I'm so glad you enjoy this recipe! It really is a game changer when it comes to pizza making, I now use it all the time. Thank you for your comment!
Steph
I made this pizza today and it was so delicious! My family devoured it. This crust is just so unbelievably tender and airy. It's hard to believe it's so easy to make! It reminds me of the pizza crust my Italian grandmother and great grandmother used to make. Thank you so much for this recipe and for all of your amazing recipes! I'm so happy I discovered your awesome website.
Nadia
Hi Steph, I'm thrilled to hear that you enjoyed this easy pizza dough recipe! In fact, it is the only pizza dough recipe I use as the results are perfect each time. Thank you very much for taking the time to comment, thanks again!
Rylee Evans
Curious what your thoughts are on replacing the flour with type 00 flour?
Nadia
Hello Rylee, I have in fact tried the recipe with 00 flour and was pleased with the results although the dough did turn out much softer. You may have to add a bit more flour on your hands and work surface when handling the dough.
Susie
I have made this twice and maybe I have handled it too much, since not as airy as I would want. I am just wondering also, would this pizza work in a Turbo oven, since there is air circulating?
Nadia
Hello Susie, it can be that you handled it a bit too much. When I stretch it out I use my fingertips to gently spread the dough and I do not make it too thin otherwise it may be less airy and more on the flat side. I have not tried baking it in a convection oven, however, but I'm sure it would work as well. Hope this helps!
tom
my 2 cents worth:
I've tried with a convection oven and find that a conventional oven (or BBQ) bottom up cooking works best. With a convection oven the top of the pizza gets cooked much faster and may leave bottom of pizza a bit underdone. If you use BBQ (with stone) you can get those nice black bits on the bottom of the crust.
If you handle the dough minimally you should get an old school pizza with a few 1-2" air bubbles in the crust. Take your time and stretch the pizza, let it rest if its not retaining is shape.
Cynthia
I cannot believe how easy and delicious this was!! Thanks for sharing! Your instructions are make it impossible to mess it up!
Nadia
Hello Cynthia, yes it really is and once you've made this dough there's no turning back. There are endless recipes to be made with this dough. I'm glad you found my instructions helpful, thank you for reaching out to me!
tom adcock
I've been making pizza dough and bread using this method for years. It is far better than any other method i have used.
A few recommendations:
1. Age the dough. let dough sit on counter for 24 hours then put back in fridge for another 24 hours. Take dough out of fridge 4 hours before shaping. I let dough rise in a bowl covered with saran wrap . i use vegetable oil on the lip of the bowl to seal air out. You will be amazed by the taste.
2. Handle the dough as little as possible. priority 1 is to keep the air in the dough. Shape pizza in the old school fashion by letting gravity stretch the dough as you turn it with your hands. Its a bit difficult to do but you will get the hang of it with time.
3. Use parchment paper. The dough is very sticky and transferring it to pizza stone can be a nightmare. Lay out a square of parchment with a bit of flour and shape dough on it after the initial stretch .You can shape it further while on the parchment. Built pizza on parchment. Let the pizza sit for 20 minutes. Cut parchment closely around pizza so the parchment only sticks out 1/4 inch. toss pizza on parchment onto pizza stone. Mid way through cooking you can slide out parchment. I have used this method up to 500 degrees. The paper will not burn.
4. Use a pizza stone . You can even set your pizza stone in your BBQ
ps i believe you meant to write the oil is hydrophobic
Nadia
Hello Tom, thank you for sharing your recommendations! I have also placed the dough back in the fridge after the initial rising for up to 3 days and love the results, so tasty! And I agree, as I mentioned in the post, you must handle the dough delicately because you want to keep that beautiful airy texture. When using my pizza stone I prefer placing the dough on the stone before adding my toppings. I prefer this rather than taking the chance of my pizza falling apart when I try to slide it on with a pizza peel. And thanks for pointing out the typo, no matter how often I reread my posts there's always one that slips by me! Thanks again!
tom
Try building the pizza (i usually make 3 x 10-12 inch round pizzas) on the parchment its makes the transfer to the stone with a peel easy and allows you to keep the stone hot. You can also build multiple pizzas and let them rest on the counter while pizza is cooking I'm going to try making your Pizza con bietole next. I am not a fan of swiss chard but my wife and relatives are. Btw if you cut salt to 1 to 1-1/2 tsp add add 3/4 cup of dried cranberries and 3/4 cup pecans and cook in a dutch oven it makes a bread that rivals anything you can buy in a bakery. If you wish i can send you cooking procedure.
Love your blog.
Nadia
Hi Tom, thank you for your expert tips. I especially like the idea of building multiple pizzas on parchment. Whenever we make pizza there's always a rush to prep them one at a time as we pop them into the oven so this is helpful! Hope you enjoy the bietola pizza, if you don't like chard try another green that you like. Perhaps escarole? Your cranberry pecan bread sounds amazing! I have a whole list of recipes I want to try using this dough so stay tuned. And thank you, I truly do appreciate your feedback!
Jeannie Lehmann
I am interested in the cooking procedure for the bread with cranberries and pecans. How much dough, how hot oven, how long to bake at what temperature, and whether to cover the Dutch oven? Thanks for any help.
Nadia
Hello Jeannie, I hope Tom can chime in with his recipe notes! This combination does sound amazing and in fact I think I will experiment with it as well!
tom
3 cups flour
1-1/4 salt
1/4 -1/2 tsp yeast (i use up to 1 tsp. (experiment see what results you get)
3/4 cup cranberries
3/4 cup chopped walnuts or better yet pecans
1-1/2 cups plus 2 tbs water
Mix flour and salt add cranberries and walnuts
Proof traditional (you can use instant but i have not tried) yeast 5 minutes water temp approx. 105F for 5 minutes
Add water to flour mix
Mix until you get a sticky shaggy dough. cover let rise 12-18 hours at RT
Transfer to counter , use parchment paper as base, shape into a ball
Cover with a large salad bowl (or what ever you have ) and let rise for 1-2 hours
Set oven temp to 450F place empty dutch oven and let heat for 30 min.
This is the tricky dangerous part: when dough is ready take the dutch oven out (be careful it will be screaming hot) remove cover and drop the dough in using the parchment paper as a cradle (parchment paper stays with you ). Try to hit the center but it does not really matter. Cover and place in oven for 25 minutes.
After the time has elapsed remove cover and bake for another 15-20 minutes.
I like an internal temp of 190F
Once done remove bread from dutch oven using a fork or just drop it out onto a cooling rack. If you have done this right the bread will snap crackle and pop as it cools
Note:
I don't use a porcelain coated dutch oven so just before transferring the bread into the dutch oven I add flour to coat the bottom and sides of the dutch over. Just a dusting to prevent the bread from sticking to the pot. I imagine that this is not necessary when using a porcelain coated dutch oven
Good luck
Tom
Nadia
Wow, that was quick! Thank you Tom for sharing this wonderful recipe!
tom
One clarification : I use sweetened dried cranberries
Jeannie Lehmann
Thank you so much for the detailed recipe. I am looking forward to trying this—Maybe when the weather is a little cooler. It sounds wonderful!
Kim
My family tried this tonight and it was fantastic, thanks for the recipe.
Nadia
Hi Kim, thank you I'm so glad to hear this. I actually have more dough on my counter for tonight's dinner right now!
Anna Bucciarelli
This is how I have made pizza dough my entire married life, learned from watching mama. May not be believable to folks who have never done this but it works. The only difference with me is that rather than flouring my hands when pushing the dough to fit the pan (I have no stone), I oil my hands with EVOO - it's what mama did and I've always done and it works fine. I love this dough, maybe because it's all I've ever known in home-made pizza, I don't know. And I particularly like Margherita pizza best of all - I don't use but a mere smidgen of oregano, rely on the flavor of God's gift from Heaven, basil for the perfect seasoning. Once a friend (non-Italian) told me she partially bakes the dough before topping it with tomatoes and cheese, her reasoning being that the mozzarellas would not get too brown during the baking process. I have not done this but I can imagine it might make sense ... your thoughts about this Nadia?
Nadia
Hi Anna, you are the second person to tell me this. Instead my mother has made, and still does, pizza by kneading the dough. So I was thrilled when I discovered this easy method that in fact reminds me of her thicker crust pizza! I have actually also tried the method you suggested of oiling my hands to fit it in the pan, and you're right it does work well too! I have also heard of partially baking the dough before adding the toppings. But quite honestly it only takes about 12 minutes to bake and if you use the fresh mozzarella balls that have a higher moisture content it does not burn. If you use regular mozzarella that you shred then it is best to wait until the final few minutes to add it. I know because I tested it with that type of mozzarella and indeed it did start to burn before the pizza was ready! Thanks for your comment Anna and please let me know if you give it a try. I actually have more dough on my counter right now!
Angie
Thank Nadia for your wonderful pizza recipe! It look so yummy!
Nadia
Hi Angie, you're se welcome! Thanks for your comment!