

Make homemade crusty Italian rolls with this easy no knead panini bread recipe! Enjoy filled with your favorite sandwich ingredients.
I'm so excited to share with you this recipe for easy to make Italian panini bread! I've been experimenting with transforming my no knead pizza dough recipe into bread for several weeks and I'm loving the results.
This ever so versatile no knead dough has been a game changer when it comes to baking. It's never been easier to make pizza, even at the last minute, when all I have to do is stir together the ingredients for the dough in the morning and let the dough proof all day long. At the end of the day I have the best homemade pizza to enjoy for dinner.
I have transformed this simple dough into so many delicious recipes for you to try. Check out a complete list further below in this post!
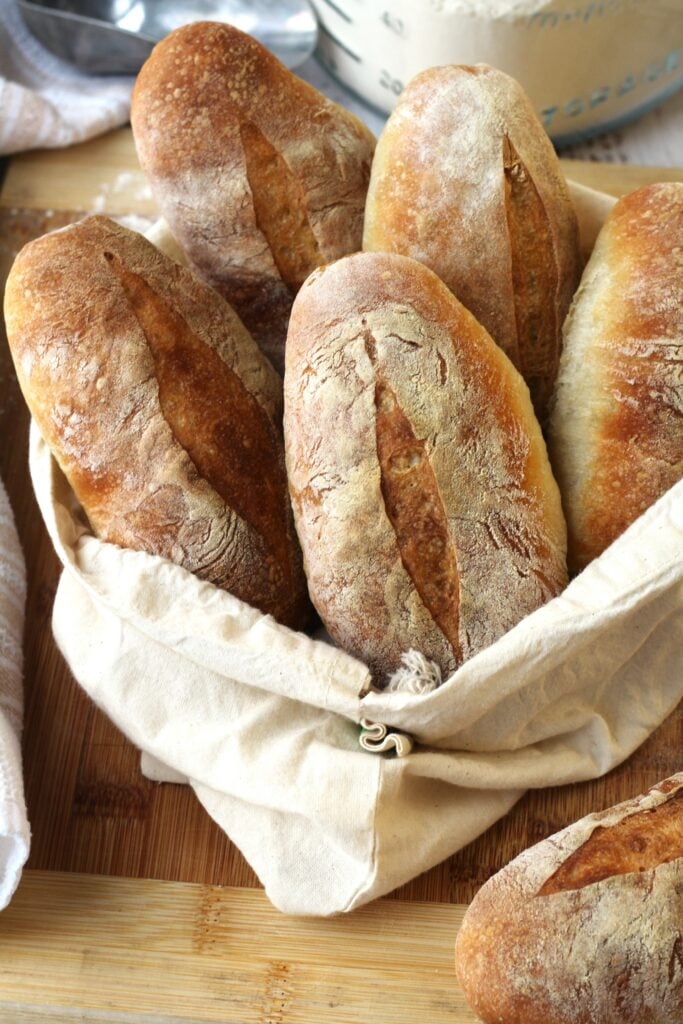
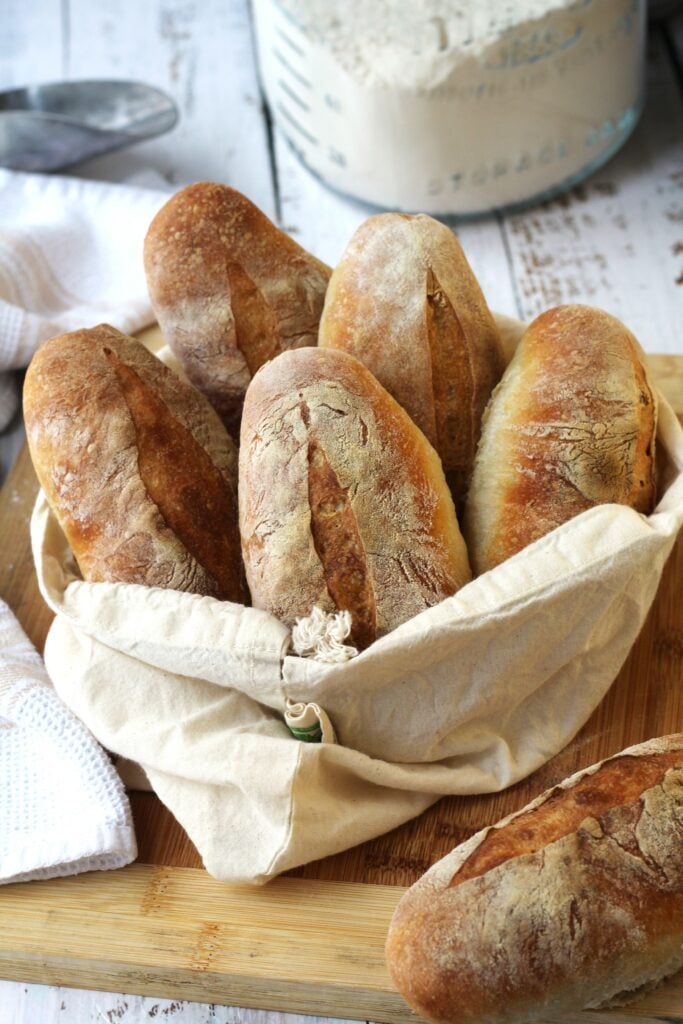
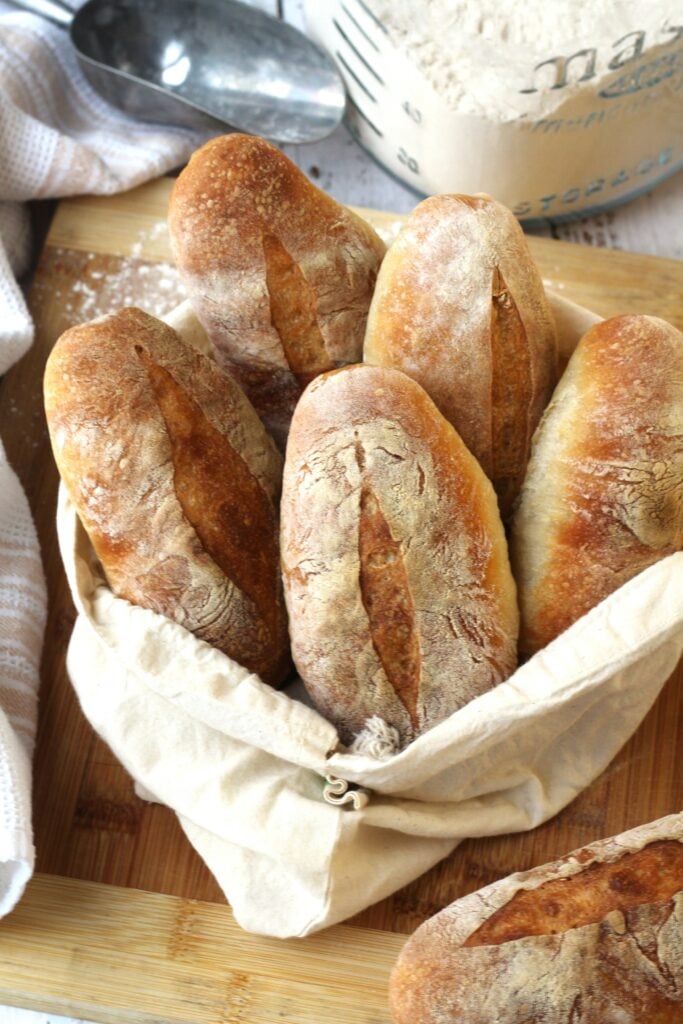
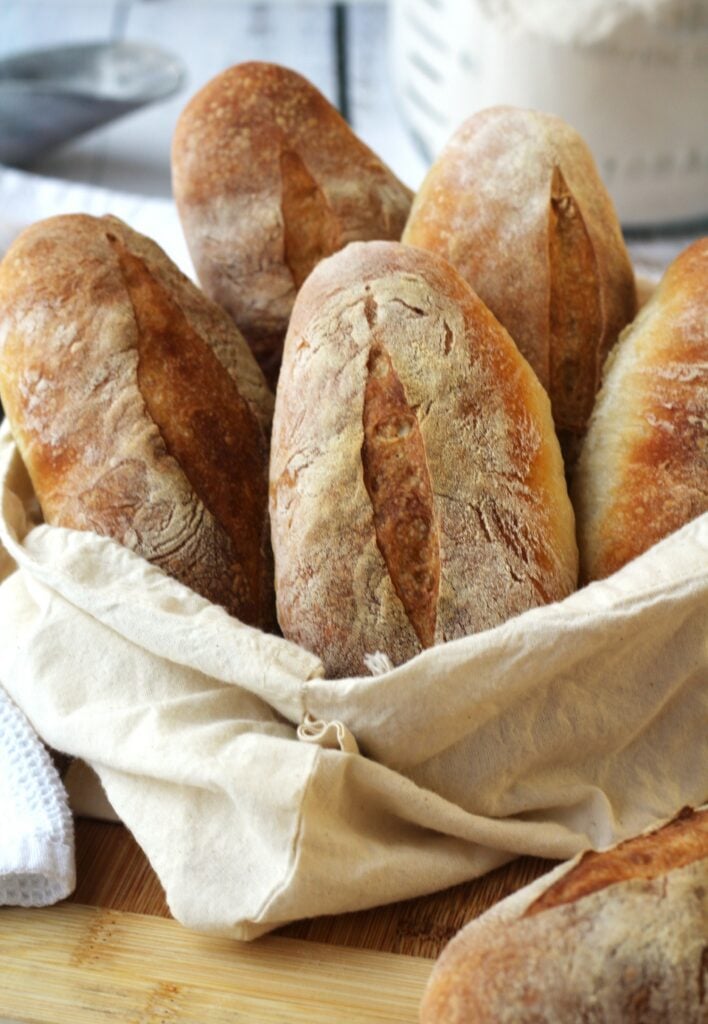
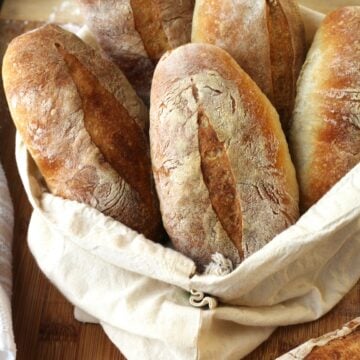
These are not your typical soft, light and fluffy grocery store rolls. My panini bread recipe makes rustic, crusty rolls with a satisfying chewy texture on the inside. Perfect for sandwiches!
I implore you to not let the 26 ½ hour prep time intimidate you. The vast majority of this is idle time waiting for the dough to rise. In reality, the hands on time required to prepare and shape the dough is only a few minutes.
Tips on handling no knead dough
My no knead dough recipe is a high hydration dough and therefore quite sticky. However this is what contributes to the wonderful texture of this bread.
So please do not despair! With a bit of practice you'll quickly learn how to easily handle this sticky dough.
- Generously flour your work surface and hands, as needed, when handling the dough.
- A bench scraper is very helpful for dividing and shaping the dough.
- Avoid overhandling the dough, it does not require vigorous kneading as a traditional pizza or bread dough.
- This no knead dough is quite soft and airy, use a light hand when shaping it in order to avoid deflating the air pockets.
Variation
Due to a lactose intolerance, I make homemade ricotta on a regular basis with lactose free milk. You can check out that recipe here!
As a result I am left with an overabundance of whey, that is the liquid leftover after the ricotta is strained. Since I hate waste, I did a little research and discovered that whey can be used in place of water when making pizza or bread.
And I must say that my family and I are hooked on the wonderful chewy texture and slightly tangy flavor that whey adds to the dough. At the same time, whey also increases the protein content of your dough.
So if you're into making your own ricotta, save that whey. As a matter of fact, I have a few glass jars of it sitting in my freezer right now! If not, the recipe works just as well with plain water.
Ingredient List
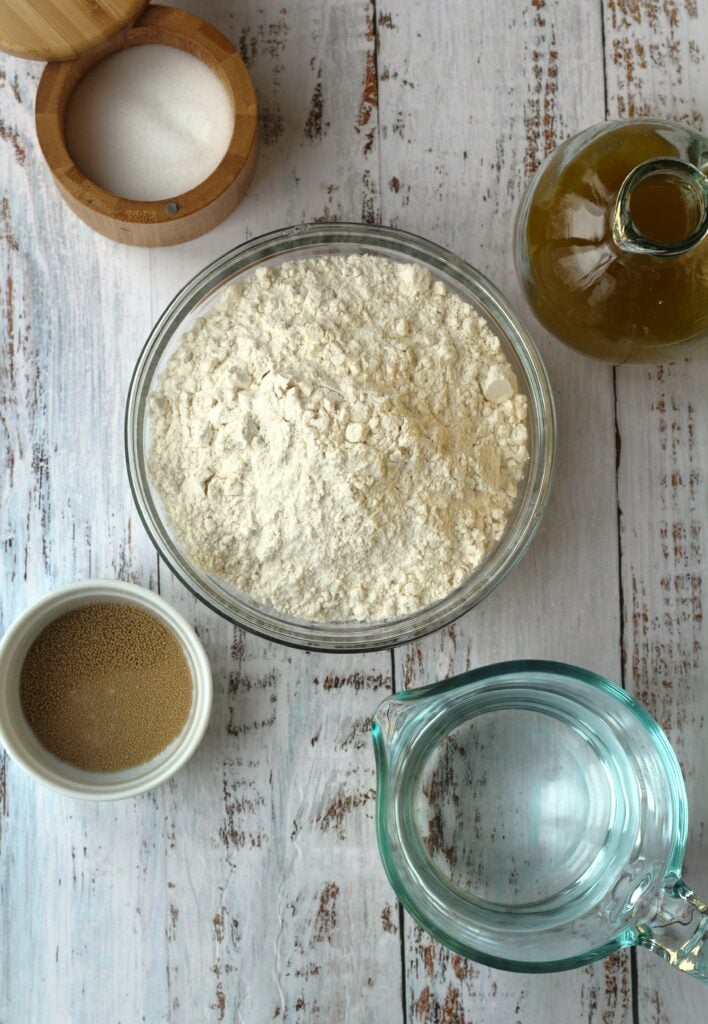
- All-purpose flour
- Active dry yeast
- Water
- Salt
- Olive oil
The following are step by step instructions with images to guide you through this recipe. Please scroll to the end of this post for the detailed printable recipe card.
Step by Step Instructions
Prepare the dough
- In a large bowl, stir together the flour and yeast.
- Heat water until lukewarm and stir into the dry ingredients.
- When the water is incorporated stir in the salt.
- Lastly, stir in the olive oil.
- The dough will be quite wet and have a shaggy appearance, this is normal.
- Cover and let rise for a minimum of 6 hours or up to 24 hours at room temperature.
- After this rising period it will be bubbly (first image below).
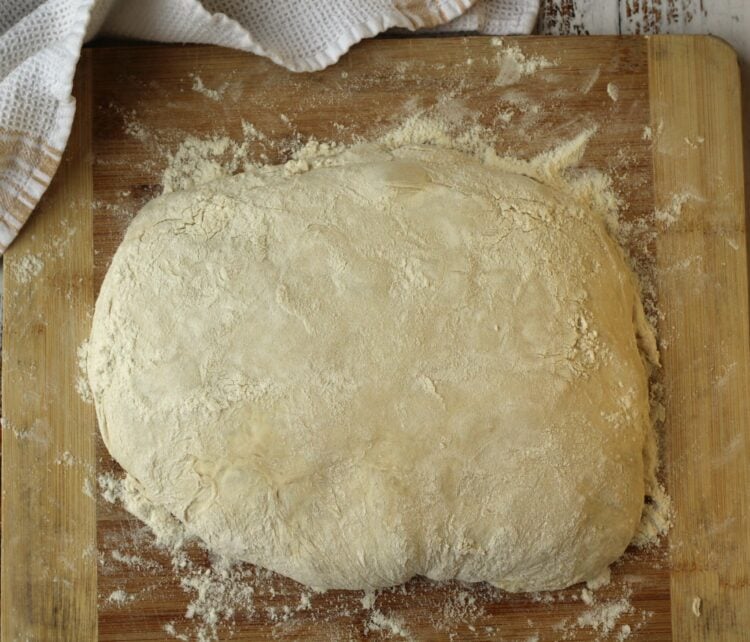
- Generously flour your hands and gently lift the dough from the sides of the bowl, tuck it underneath to shape into a ball. Do not attempt to knead the dough!
- Place it back in the same bowl, cover and let rest for one hour.
- This step is crucial as it will make the dough easier to handle in the next step.


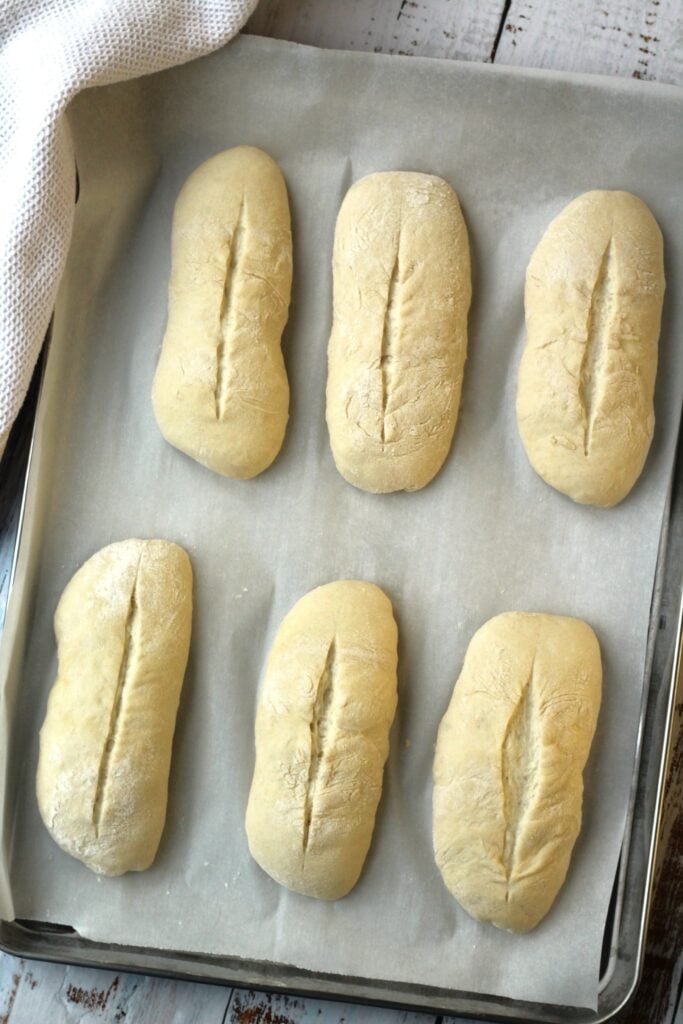
Shape the panini
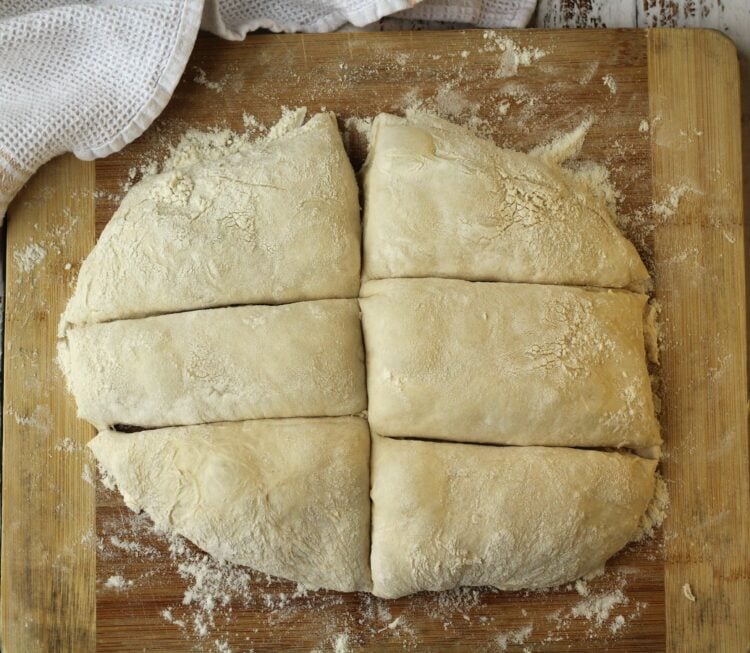
- Dump the dough onto a generously floured surface.
- Use a knife or bench scraper to divide the dough into 6 pieces. You may eyeball this or use a kitchen scale to divide the dough equally into roughly 140 gram pieces.
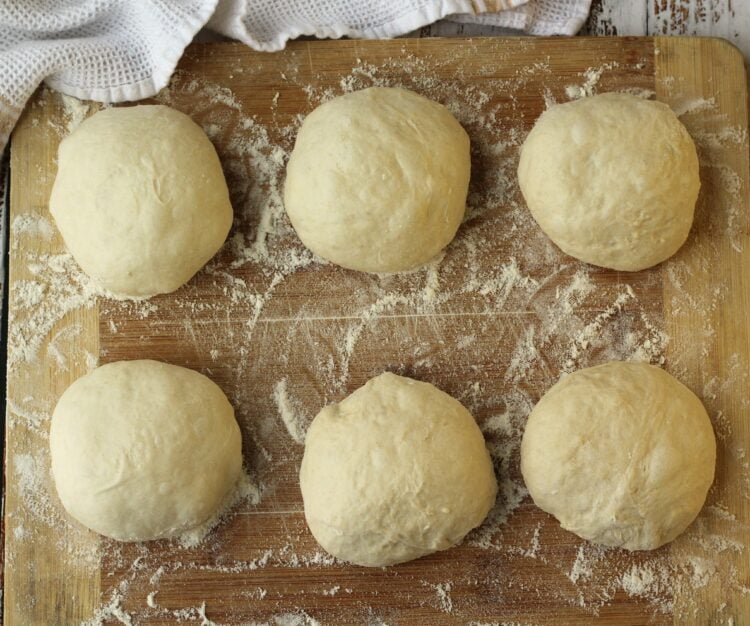
- Shape the dough into balls, cover and let rest for 30 minutes.
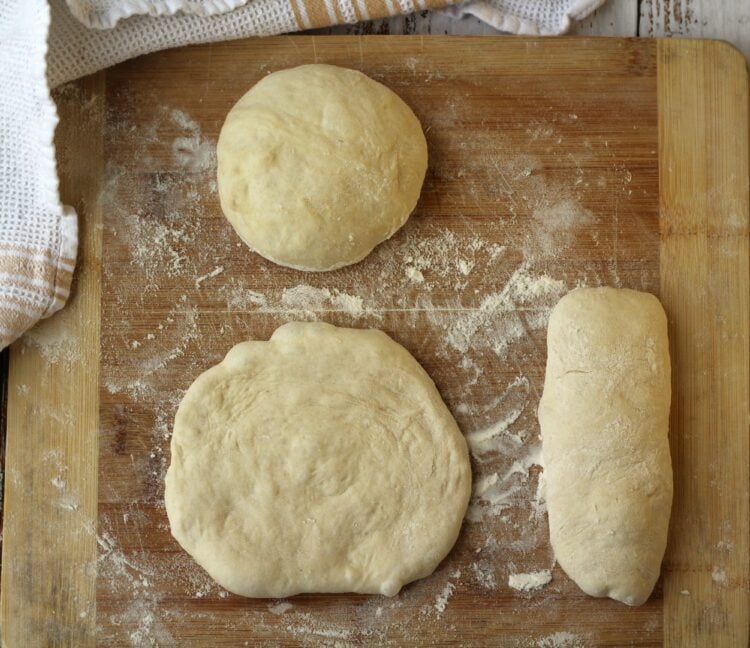
- Gently flatten each ball into roughly a 5 inch circle or oval shape.
- Apply gentle pressure to avoid deflating the dough.
- Roll each flattened circle of dough into a cylinder.
- Place on a baking sheet. Cover and let rise one more hour.
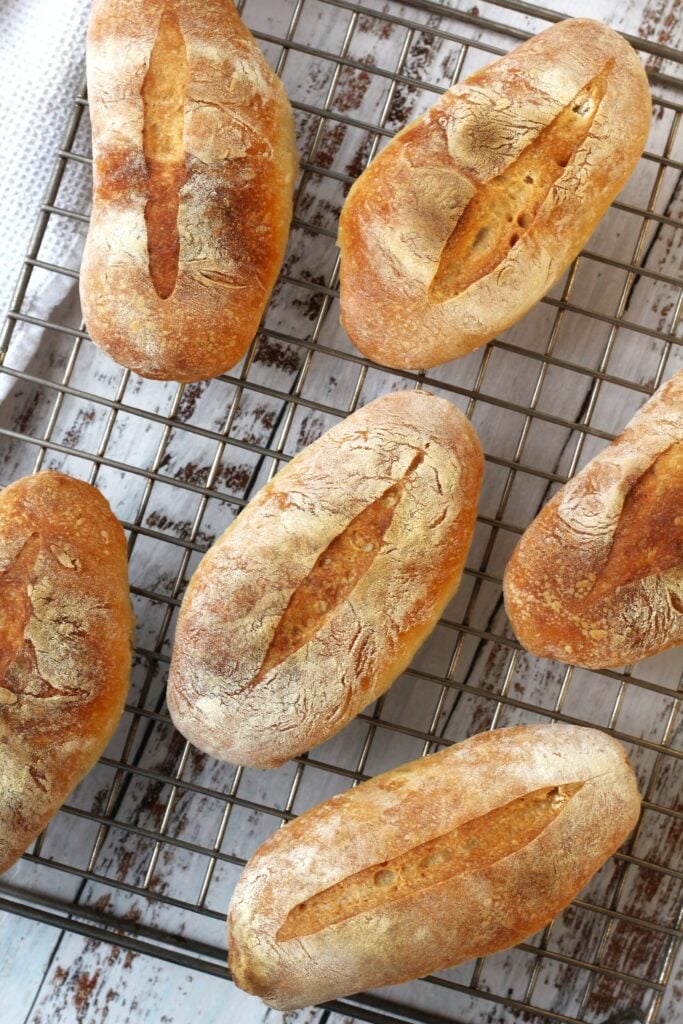
- Meanwhile preheat oven to 425 degrees F.
- Place a pan of water on the lowest rack in the oven. Place your middle baking rack as close to the bottom of your oven as possible, just above the pan with the water.
- Score each panini using a sharp knife or bead lame. Do not make the incision too deep as you don't want to deflate the panini.
- Bake for about 25 minutes until golden brown on top and golden underneath.
- Transfer to a wire rack and let cool before cutting.
Recipe Notes
-Replace up to 1 cup of white flour with whole wheat flour.
-Make round panini instead of oval shaped. After the dough is shaped into balls, let rise one hour, then score the buns before baking.
-The dough may be divided into 8 pieces for small panini or into 4 pieces for submarine (or hoagie) rolls.
-Use this bread to make traditional panini stuffed with coldcuts and cheese.
-Try my pane cunzatu recipe, a traditional Sicilian sandwich.
-For a vegetarian option, fill with marinated roasted vegetables.
Store at room temperature, for up to 2 days for the best texture, well wrapped in a plastic bag; cloth bread bag or bread box.
Place, well wrapped, in a freezer safe container for up to 1 month. Thaw at room temperature. They may be warmed in the oven before serving.
Did you try this recipe?
Let me know how much you enjoyed it by rating it in the recipe card below!
*****
Check out more easy no knead dough recipes!
- Easiest No Knead Pizza Dough Recipe
- Parigina Pizza
- Pizza Fritta (fried pizza dough)
- Olive and Cheese Buns
- Chicory, Egg and Cheese Stuffed Pizza
- No Knead Fig and Rosemary Focaccia
- Mortadella, Pistachio and Mozzarella Stuffed Buns
- Focaccia Messinese
- Sfincione Bagherese
- No Knead Fig and Walnut Bread
- No Knead Skillet Focaccia Bread
- Scacciata with Potatoes and Sausage
- Scacciata with Cauliflower and Black Olives
- Paprika and Garlic Herb Bread
No Knead Italian Panini Bread Recipe
Ingredients
- 3 cups all-purpose flour plus extra for handling the dough
- 1 tsp. active dry yeast
- 1½ cups water heated until lukewarm
- 1½ tsp. salt
- 1 tbsp. olive oil
Instructions
Prepare the dough
- In a large bowl, use a wooden spoon to stir together the flour and yeast.
- Heat water until lukewarm and stir into the dry ingredients. When the water is incorporated stir in the salt. Lastly, stir in the olive oil.
- The dough will be quite wet and have a shaggy appearance, this is normal. Cover and let rise for a minimum of 6 hours or up to 24 hours at room temperature.
- After this rising period it will be bubbly.
- Generously flour your hands and gently lift the dough from the sides of the bowl, tuck it underneath to shape into a ball. Do not attempt to knead the dough!
- Place it back in the same bowl, cover and let rest for one hour.This step is crucial as it will make the dough easier to handle in the next step.
Shape the panini
- Dump the dough onto a generously floured surface. Use a knife or bench scraper to divide the dough into 6 pieces.
- You may eyeball this or use a kitchen scale to divide the dough equally into roughly 140 gram pieces. Shape the dough into balls, cover and let rest for 30 minutes.
- Gently flatten each ball into roughly a 5 inch circle or oval shape. Apply gentle pressure to avoid deflating the dough.
- Roll each flattened circle of dough into a cylinder. Place on a baking sheet. Cover and let rise one more hour.
- Meanwhile preheat oven to 425 degrees F. Place a pan of water on the lowest rack in the oven. Place your middle baking rack as close to the bottom of your oven as possible, just above the pan with the water.
- Score each panini using a sharp knife or bead lame. Do not make the incision too deep as you don't want to deflate the panini.
- Bake for about 25 minutes until golden brown on top and golden underneath.
- Let cool completely before serving.
Notes
-Make round panini instead of oval shaped. After the dough is shaped into balls, let rise one hour, then score the buns before baking.
-The dough may be divided into 8 pieces for small panini or into 4 pieces for submarine (or hoagie) rolls. Serving suggestions: -Use this bread to make traditional panini stuffed with coldcuts and cheese.
-Try my pane cunzatu recipe, a traditional Sicilian sandwich.
-For a vegetarian option, fill with marinated roasted vegetables. Storage: Store at room temperature, for up to 2 days for the best texture, well wrapped in a plastic bag; cloth bread storage bag or bread box. To Freeze: Place, well wrapped, in a freezer safe container for up to 1 month. Thaw at room temperature. They may be warmed in the oven before serving.
Maggie
I am a bit late to comment however, I noticed that Nadia still reads them and other people might benefit. Just a few points to the people having trouble handling the wet dough, I use the 75% hydration, means 500g of flour to 375g liquid and YES I use whey, just made some cheese so had to use it up. I do not use my hands to lift the dough after first rise, I use either a silicone spatula or a dough scraper and use the stretch method, stick the spatula on one side and lift, flod over, I do it all around the bowl. When I do my final shaping I dump the dough on very well floured bench topfold it over and shape like you did. I ususally omit the shaping into balls, just after cutting the dough into segments I push each into a shape desired, leave the to rise in a baking tray, I do not score them, I use egg white with a teaspoon of milk as a wash and sprinkle them with seeds, sesame, poppy, parmesan or even dukha.
Nadia
Hello Maggie, you are definitely not late to comment and I appreciate your input as I am not an expert when it comes to hydration levels. Thank you for sharing what worked for you in this recipe, I'm sure other readers will appreciate it as well. Thank you!
T
This was an overly wet mess. Triple checked my measurements were correct (used kitchen scale to weigh flour), and after the first rise, too wet to even handle. Tried to add some flour, even that wouldn’t help. By no means am I a bread making expert, but I’m also not a beginner. Have never had this happen before.
Nadia
Hi, I'm sorry to hear this. I have made this recipe numerous times with success and I'm wondering what happened when you added more flour, did the dough not come together then? Sometimes it's hard to offer advice because of course I'm not there with you to see exactly what happened but I'd like to try to help if I can. Thanks for reaching out!
Chas
Thanks for your response Nadia. Can you please confirm that your metric recipe works as well. Also, once you have added more flour, what is the usual recipe and %H?
Nadia
Hello Chas, I'm sorry to hear you did not have success with this recipe. Indeed the metric measurements do work for me as well. Also to clarify, I did not have to add more flour to my bread dough. However, there are readers who have said they needed to add more flour to the no knead dough in order to get their dough to hold together, but it has not been the case for me. Indeed it is a high hydration dough however handled gently and with some practice, the recipe does work.
Sid
Nadia....I wasn't loafing around making these....your recipe was on point, easy, and end results, perfect. 2nd time making these which was a lot of easier and good taste......Thank you !!!
Nadia
Hello Sid, ha, love it! Thank you for much for your lovely, as well humorous comment, I thoroughly enjoyed this one and I'm thrilled to hear you enjoyed my panini recipe. Grazie!
Ellen
My kitchen standmixer broke. I found this and made bread with with currants, raisins and walnuts. Turned out perfect! Decided to dump the standmixer and made another loaf. Half white, half whole wheat with pumpkin seeds. On the counter now to rise. No knead, no effort, Loving it! Thank you!
Nadia
Hello Ellen, thank you for sharing your variations of this panini recipes, they sound delicious! Enjoy!
Jim Maloney
When covering the dough do you use a solid cover or something porous like cheese cloth.
Nadia
Hi Jim I use a dish towel or even plastic wrap. I don’t want a ‘skin’ to form on the dough. Hope this helps!
Tina
Tips or tricks to the initial handling of the very wet dough? Lifting from the sides and tucking under after the very first rise. This step was a complete flop for me. Do you literally pick up the dough and form a ball in your hands? Or do you lift the sides and try to tuck the dough under from inside the bowl? I am very new to bread making also and I completely understand it takes time to learn 😬
Also, my dough remained a lot wetter than yours based on your pictures.
Nadia
Hi Tina, indeed handling this soft no knead dough can be challenging at first. As for shaping into a ball after the first rise, I simply reach into the bowl to lift the sides and tuck underneath without actually lifting it out and shaping it with my hands. I find this technique makes it easier to handle. After it rests again, it becomes much easier to handle in order to shape it. And if you do find it too wet to handle, you may add a little bit of extra flour. You may also flour your hands to make it easier to handle. I do hope you give this recipe another try and do let me know how they turn out next time!
Henry
Did this recipe twice (once for a gift) and both time it tasted quite good, only downside was that there are a few steps that didn't look like the provided pictures (the cylinder and scoring steps specifically)
Mine still behaved in a more liquid way compared to the images where they look denser, but it could've been entirely on me for being too careful to avoid kneading and accidentally deflating them. Again, they tasted great, would do it again!
Nadia
Hello Henry, that shaping step does take a bit of practice for sure! The secret as you mentioned is to not overly handle the dough so as to deflate it when you are shaping it. There is not much I can add to those instructions that can help more. But I'm glad you enjoyed the flavor. Keep on practicing and thanks for your comment!
Cathy Hatchel
Mine turned out into flat lumps. I did use instant yeast instead of regular yeast so I think this was the problem. Still very tasty. I will try again with regular yeast. Thank you!
Nadia
Hi Cathy I'm so sorry to hear this! I'm not quite sure the instant yeast was to blame, that is unless it was expired. But I do hope you get a chance to try again, do let me know!
Cheryl Whitmore
So easy, and so tasty
Nadia
Thank you Cheryl, I'm so glad you enjoyed these panini!
Geoff Mortimer
Hi
Do you publish airfryer recipes?
Nadia
Hi Geoff, I think I am one of those rare people who does not own an air fryer so unfortunately I can't help with this!
Michel M
very wet dough did not raise like the pictures, cooked them in my pizza wood oven did not want to burn them so my temp was probably low a bit, they do taste good
Nadia
Hello Michel, this is a high hydration dough and therefore definitely a lot stickier to work with. I'm sorry to hear that it did not rise as much as you had hoped for. The higher baking temperature is definitely key to making them rise more when they are baking. I do hope you give them another try! Thank you for your comment.
Tania
Hi Nadia,
Do you think I could do these with a gluten free flour?
They just look soooo amazing- reminds me of my childhood.
Thanks, Tania
Nadia
Hi Tania, unfortunately I do not have any experience baking with gluten free flour so I can not confirm whether the recipe would work. Perhaps any other readers may chime in?
Madison Steel
Oh my goodness, I cant thank you enough for sharing your recipe. I was looking for a quick and easy recipe to make panini buns for my husband since we ran out mid week and I didn't feel like going to the grocery store, haha. I prepared in the morning and it was ready by the early evening for the next day. I cant believe how great it turned out! Crispy on the outside and soft on the inside. Incredible how low maintenance it is and all you really have to do is wait for the proofing and spend little time physically doing anything. It's safe to say I will not be purchasing buns anymore!! Thank you again. Can't wait to check out your other recipes!
Nadia
Hi Madison, I'm so glad you enjoyed this easy panini recipe, it is a game changer for sure. No need to buy panini any more! Thank you for taking the time to comment and hope you enjoy my other recipes as well!
JJ Bergh
Fantastic made as directed.
Nadia
Hello JJ so glad you enjoyed it, thank you!
tom adhoc
I made these for the Italian side of the family. They were amazing. They did not believe that I made them. They were convinced that i bought them at the bakery and was taking credit. The word 'fugazi' was mentioned.
BTW I'm on a low salt diet so I lowered the salt and let the dough sit in the fridge for a few days to develop taste. Just as good!
Nadia
Hi Tom, they do look like bakery panini, right? But much better tasting of course. In fact I have stopped purchasing my panini since I can easily whip up a batch of these within the day. Thank you for your lovely comment!
Kiara
Ciao Nadia!
Can the dough be made the night before and shaped and baked the next morning?
Nadia
Hi Kiara, I often prepare this no knead dough up to 24 hours ahead of time so sure. Leave the dough at room temperature for up to 24 hours, then shape and bake them. Hope you enjoy!
Allison
Hi - these look so great! Can they be made into loaves instead of rolls?
Nadia
Hello Allison, yes you definitely can! I have so far divided this dough into 8 small panini as well as 4 large submarine (or hoagie) rolls so you can definitely make larger loaves if you'd like. The baking time may require some adjusting. Make sure they are golden both on top and underneath. Hope you enjoy them!