

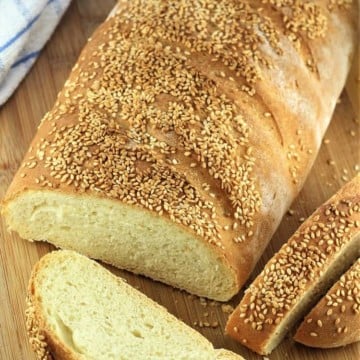
Semolina bread with sesame seeds is quite typical of Sicily. This rustic loaf has a crusty exterior, a pale yellow interior due to the use of semolina flour and is topped with sesame seeds giving it a wonderful crunch and nutty flavor!
This post contains affiliate links.

Semolina bread with sesame seeds is commonly found in Sicily. In recent trips there, I enjoyed this rustic, hearty country style bread. Made with mostly semolina flour, this bread has a crumb which is much more dense than your typical loaf. It definitely gives you something to sink your teeth into!
I've been working on this bread recipe for almost a year now. I tried several times to make it with only semolina flour however I was not satisfied with the texture. However, I have finally found a combination of mostly semolina flour and some all purpose white flour that, in my opinion, comes close to the bread I enjoyed during my travels!

What is semolina flour?
Semolina flour is made from durum wheat and this is the same type of flour used for making dried pasta. The semolina I used is a double milled flour (much finer texture) referred to as semolina rimacinata. I actually found this product imported from Italy at my local grocery store and found that Amazon also sells it. Here's a link for that flour:
") Molino Antimo Semolina Semo...Shop on Amazon
Molino Antimo Semolina Semo...Shop on Amazon
I have, however, made this bread with regular semolina flour usually located in the same aisle as other types of flour in the grocery store. This flour also works well for this recipe, however the texture may be slightly more gritty.
What makes this bread so typical of Sicily:
-
- The use of double milled semolina flour.
- Sesame seeds sprinkled on the bread adding a wonderful nutty flavor and crunch to the bread which I find particularly satisfying.
- The elongated shape of this bread, often referred to as a filone.
The following are step by step instructions with images to guide you through this recipe. You'll find the complete detailed printable recipe card at the end of this post.
How to make Semolina Bread with Sesame Seeds:
Begin by proofing your yeast: heat water until lukewarm and place in a small bowl. Stir in honey until it dissolves. Add an envelope of instant yeast (8 grams), stir gently and let sit until foamy, about ten minutes.

Meanwhile, add semolina, all purpose white flour and salt in the bowl of your stand mixer. Mix until combined. Pour in the yeast mixture and on gentle speed mix until combined and a dough begins to form. The mixture will be very wet at first, this is normal.
Mix on medium speed for eight minutes until the dough is smooth and elastic. After 4-5 minutes of kneading, the dough will wrap itself around the hook (as shown) and pull away from the sides of the bowl. The dough will be slightly sticky and soft.

Shape into a ball. Transfer to a greased bowl, cover with plastic wrap and place in a warm area, free from draft until it doubles in bulk, about two hours. Shape the dough: after two hours have passed, transfer the dough to a lightly floured work surface. Punch down the dough and using your finger tips, flatten the dough into a rectangle, about 13 x 9 inches.
Fold the long edge of the dough ⅔ of the way toward the center of the rectangle, as shown. 
Fold the other long edge over the the first fold, as shown. Tuck in the ends by making a small fold toward the interior of the bread in order to seal the ends. 
Turn the dough over and carefully lift onto a parchment paper covered baking sheet. 
Lightly brush the surface with water and top with sesame seeds. Use a sharp knife to make four or five horizontal slits on the dough. Cover with a clean tea towel and let rest for thirty minutes.
Meanwhile, preheat oven to 425F and place a pan of water on the bottom rack of your oven. Bake for 20 minutes, then reduce oven to 375F and continue baking for ten to fifteen minutes longer, until the bread is golden and sounds hollow when tapped.
Transfer to a wire rack and allow it to cool completely before slicing it. 
Check out my Google Web Story here!
Is it possible to make Semolina Bread with Sesame Seeds without a stand mixer?
The answer is yes! The only difference is that you will have to handle the stickier dough by hand. After testing this method several times I conclude that it does work.
- Combine semolina flour, all-purpose flour and salt in a bowl.
- Make a well in the center and stir in the proofed yeast with a wooden spoon until a raggedy dough takes shape.
- Transfer the mixture onto a well floured surface and knead the dough for about 5 minutes. Add a spoonful of flour at a time as needed if the dough becomes too sticky to handle.
- Shape into a ball and proceed with the recipe.
Can semolina bread dough be prepared a day in advance?
Yes it can. Let the dough rise at room temperature for 1 hour and refrigerate overnight. Let the dough come to room temperature, about 2 hours, before proceeding to shape it as outlined in the recipe.
Tips and suggestions for making Semolina Bread with Sesame Seeds:
- If you can not find double milled semolina flour in your grocery store, regular semolina flour will work as well.
- The dough for this bread will be slightly sticky and softer than most other bread dough. This is normal.
- Place a pan of water on the lower rack of the oven while baking to give the bread a crusty exterior.
- Wait until the bread has cooled completely before slicing it.
- Store the bread well sealed at room temperature for up to three days.
- Freeze the bread in a freezer bag for up to a month.
- I enjoy using this bread to make bruschetta. It is also perfect with one of my favorite egg recipes, my dad's famous fried tomatoes with eggs

Is there anything better than the scent of fresh bread baking in your home? Now you can make your own hearty, country style Semolina Bread with Sesame Seeds for your family! Let me know how much you enjoy it by tagging me with your bread photos with @mangiabedda or #mangiabedda on Facebook or Instagram. Buon appetito!
Semolina Bread with Sesame Seeds
Ingredients
- 1 envelope dry yeast (8 grams)
- 1 ⅓ cups water
- 2 teaspoon honey
- 1 ¾ cups double milled durum semolina flour semolina rimacinata, see note below
- ¾ cups all purpose flour
- 1 teaspoon salt
- 2 tablespoon sesame seeds
Instructions
For the dough:
- Begin by proofing your yeast: heat water until tepid and place in a small bowl. Stir in honey until it dissolves. Add an envelope of instant yeast (8 grams), stir gently and let sit until foamy, about 10 minutes.
- Meanwhile, add the semolina flour, all purpose flour and salt in the bowl of your stand mixer. Mix until combined. Pour in the yeast mixture and on gently speed mix until combined and a dough begins to form. The dough will be very wet at first, this is normal. Mix on medium speed for 8 minutes until the dough is smooth and elastic. After 4-5 minutes of kneading the dough will wrap itself around the hook and pull away from the sides of the bowl. Transfer to a greased bowl, cover with plastic wrap and place in a warm area, free from draft until it doubles in bulk, about two hours.
To shape the dough:
- After two hours has passed, transfer the dough to a lightly floured work surface. Punch down the dough and using your finger tips, flatten the dough into a rectangle, about 13 x 9 inches.
- Fold the long edge of the dough ⅔ of the way toward the center of the rectangle. Fold the other long edge over the the first fold.. Tuck in the ends by making a small fold toward the interior of the bread in order to seal the ends.
- Turn the dough over and carefully lift onto a parchment paper covered baking sheet, seam side down.
- Lightly brush the surface with water and top with sesame seeds. Use a sharp knife to make three or four horizontal cuts on the dough. Cover with a clean tea towel and let rest for thirty minutes.
To bake:
- Meanwhile, preheat oven to 425F and place a pan of water on the bottom rack of your oven. Bake for 20 minutes, then reduce oven to 375F and continue baking for ten to fifteen minutes longer, until the bread is golden and sounds hollow when tapped.Transfer to a wire rack and allow it to cool completely before slicing it.
Notes
- Combine semolina flour, all-purpose flour and salt in a bowl.
- Make a well in the center and stir in the proofed yeast with a wooden spoon until a raggedy dough takes shape.
- Transfer the mixture onto a well floured surface and knead the dough for about 5 minutes. Add a spoonful of flour at a time as needed if the dough becomes too sticky to handle.
- Shape into a ball and proceed with the recipe.
Can semolina bread dough be prepared a day in advance?
Yes it can. Let the dough rise at room temperature for 1 hour and refrigerate overnight. Let the dough come to room temperature, about 2 hours, before proceeding to shape it as outlined in the recipe. More tips:- If you can not find double milled semolina flour in your grocery store, regular semolina flour will work as well, however the texture will be slightly more gritty.
- The dough for this bread will be slightly sticky and softer than most other bread dough. This is normal, do not add extra flour.
- Place a pan of water on the lower rack of the oven while baking to give the bread a crusty exterior.
- Wait until the bread has cooled completely before slicing it.
- Store the bread well sealed at room temperature for up to three days.
- Freeze the bread in a freezer bag for up to a month.
Nutrition
We are a participant in the Amazon Services LLC Associates Program, an affiliate advertising program designed to provide a means for us to earn fees by linking to Amazon.com and affiliated sites.


Christine A Whitelonis
I have Gold Medal semolina. Is this fine enough for your recipe?
Nadia
Hello Christine, I do recommend double milled semolina flour (semolina rimacinata) that has a finer texture than regular semolina for this recipe. However, I have made the recipe with regular semolina and it does work well however the texture is slightly more gritty. That said you can go ahead and use the semolina that you have and if you find the dough a little 'soupy' as some readers have, add more flour as needed until the dough comes together. I do hope this helps!
Pamela Carnine
I’ve made this loaf several times and it always turns out great! Also, thank you for adding some Sicilian recipes that are made without traditional all purpose flour. I’m gluten free , and those recipes are nice surprises !
Nadia
Hello Pamela, thank you for your comment! I'm so glad it turned out great and I do hope you enjoy the other recipes made without AP flour. Thanks again!
Mary
Came out perfect and it’s very easy!
Nadia
Thank you for your comment Mary, I'm so glad you enjoyed this recipe!
Lynnmarie
The dough is way too wet even after kneading and rising. How would i adjust the amount of flour without over kneading?
Nadia
Hi Lynnmarie, if you take note of other reader's comments some added up to an extra 1 1/2 cups of semolina flour to the recipe. The recipe has always worked for me with this amount and my guess is that different varieties of semolina used (depending on where you live!) may give different results. I hope this helps!
CAROLE DONAHUE
Dough was way too wet so I had to add more flour and semolina (about 1 1/2 cups). It then came together nicely.
Nadia
Hi Carole, thank you for your feedback. You are definitely not the only reader to share that they added more flour to this recipe. My only guess is that it may depend on the brand of semolina that one uses. Thank you for taking the time to share!
Joni
Hello,
I made this bread and it was delicious But, I followed the recipe exactly and My dough was too runny. It never formed a ball, so I added 1 1/2 c more of the semolina flour. After that, it came together nicely. I even did a second batch to see if I measured my flour incorrectly. The second batch also needed flour added. Thoughts?
Nadia
Hi Joni, thank you I appreciate your feedback. This does perplex me and you are not the first to say that the recipe worked well my adding more flour. In my opinion it must be the type of semolina flour used. Perhaps different products available in different parts of the world work out differently in this recipe. But I am glad to hear that it worked out with your modification so I guess it's best that you add this additional flour when you prepare this recipe. Thank you for taking the time to share this with me and my fellow readers!
Barbara McNichols
At one time I was able to purchase Sesame Semolina loaves at a well known chain bakery but they haven't made it for years. I am looking forward to trying your recipe soon but wonder if it can beade in loaf pans or dishes and if you have any suggestions for doing so?
Nadia
Hi Barbara, I must admit I have never made this bread recipe in a loaf pan but I don't see why it wouldn't work. I have tried making other types of bread in a bread loaf (such as sourdough bread) and I bake it at the same temperature. I would say to keep an eye on it and bake until you see that it is sufficienlty golden both on top and underneath. Sorry that I can't be a lot more specific than that with baking times. Hope it turns out well!
Barbara McNichols
I did it! Two perfect loaves came out of the oven about three hours ago. Used the glass loaf pans at 400F and lowered temp to 375 F after 15 minutes as the were browning quickly. Also rotated from to back. At 35 minutes, tested with bamboo skewer and moved both to cooling rack for 10 minutes, then popped them out. I just toasted two slices, butter, honey a cup of tea. Perfection! Thanks so much for putting your recipe on line!
Nadia
Hi again Barbara, thank you for your feed back. I'm thrilled to hear they turned out well in the loaf pans and thank you for sharing your tips with me and my readers, it is truly appreciated. Now I'll have to try this as well! Thanks again!
Donna S
This recipe was so easy and the bread smells delicious. My loaf didn't rise much though, I think it was due to too much of an earlier first rise. When I made the dough I put it in the oiled bowl in my oven. I had turned the setting to "proof" but turned it off after I put the dough in as I didn't want it to be too warm. The dough had about tripled in size after an hour which surprised me, so I took it out then. It didn't rise much while sitting for the half hour before baking and is still fairly flat as a finished loaf. I bake a lot of sourdough bread and always do the rises in my oven on proof so I don't think that it was overly warm. Suggestions for next time?
Nadia
Hello Donna, first of all thank you, I'm glad to hear it smelled delicious! In my experience, after the first 2 hour rise the dough does double in bulk. I don't have any experience with using the proofing function on an oven so I can't really comment on that. Perhaps it was too hot as it tripled after an hour? After shaping as you can see in the photos it does not rise a whole lot. Unlike your typical loaves made with AP flour this loaf does not rise as much and this is normal. This bread is all about the chewy texture in my opinion. I do hope this helps, it's always difficult to comment since of course I'm not there to witness the process. Please do not hesitate to reach out again!
Barbara McNichols
Will keep an close eye on the timing and let you know. Also, will be using glass loaf dishes so may need to lower temps. Need to check that.
Max Turner
I made this today and doubled the recipe suing 5 Stagione Semola and Glick's AP unbleached and I had basically a soup. I added approximately a cup or so more flours keeping the ratio similar and had a soft dough like in your photos. I always do my breads by feel and instinct so no problem. The seeds did not adhere very well using just the water so maybe next time I will try an egg wash. I did put a pan of water in the oven before pre-heat and the result was excellent and it made delicious Italian hoagies.
Nadia
Thanks you Max for sharing your experience with this recipe, I'm glad to know it worked out and yes, I agree, with some bread making experience you definitely know how to work the dough according to feel. Thanks for your comment!
Nina Altschiller
I used the website's conversion to metric, and the measurements were wrong. It said 294 G semolina when it should have been 328 G (or 190 G per cup). I fixed it, but not before I had been kneading for 8 minutes, and the dough looked like cake batter. Your recipe is correct, but the website's conversion is not. The dough was soft, but pliant and the bread was delicious.
Nadia
Hello Nina, it appears the automatic conversion tool is unfortunately not always accurate. Thank you for sharing this with me, I hope it is helpful for others!
Cindy Lambrecht
I love the flavor and all but I don’t know why I didn’t get much rise after 2 hr. Rise and shape and rest, and no oven rise at all. Any suggestions?
Nadia
Hi Cindy, I'm so sorry to hear this. The first question I always ask when I hear this happens is if your yeast is ok and not expired? Did your dough come together as pictured on my blog either with a stand mixer or by hand? I'd like to try and help you figure it out although it's a little challenging since I can not see your dough.
Cindy
Hi! Yes I used fresh King Arthur yeast. Everything seemed fine until the end of the 2 hr rise. It had fallen just a bit and was very wet. I may also have used too much oil in my bowl? I really want to try again it has such a great flavor and crust. Thanks!
Nadia
Hi Cindy, that is unusal. Yes perhaps it was a bit too much oil, it seems odd that it would fall if it was going well until then. I hope you do give it another try, please let me know how it goes. Thanks Cindy!
David Alexander
Hi, Cindy: I have made this bread about a half dozen times just as written, and it is always perfect. But I know that sometimes breads can fall if they are overproofed. In this recipe, I think it is best to keep an eye on the dough, rather than an exact time on the clock. I have found even with this bread, sometimes it is 2 hours, or it may require only 1 hour or 1.5 hours. The rise time can depend on so many things: the temperatur e of your kitchen, the humidity, even the all purpose flour used. So definitely try again and keep an eye on the dough. Good luck and let us know how you make out.
Cindy
Hey, thank you! I think that I may have done that. I only went by the clock. I do plan to go at it again, of course. The taste was amazing!
Markie D
It seems that every time I knead the dough after it rises it does not rise again. it had some rise while resting but failed to rise in the oven. it looks like a Subway hoagie roll but a smidge larger. Disappointing after the work and time. Thank you for sharing anyways.
Nadia
Hello Markie, I'm sorry to hear you had difficulty getting the bread to rise. I just wanted to clarify, after the initial 2 hour rise you do not need to knead the dough again. Simply punch it down and shape it into the rectangle as in the instructions. I am wondering perhaps if you overhandled the dough at this point? After it is shaped and rises again it is ready for the oven. As you can see in the photo this bread is not particularly puffy and does look a little more like a "hoagie roll" in shape, but of course the flavor and texture is completely different. I hope this helps and thank you for reaching out to me with your comment!
Karen
Nadia, what does the water-in-the-oven step contribute to the end result of the bread? Also, I am not using sesame seeds since I have diverticulitis. Thank you in advance Nadia.
Nadia
Hello Karen, the reason for this is that by adding steam to the oven, it gives the exterior of the bread an extra crispy texture. It is not absolutely necessary but the result is wonderful. And you can definitely omit the sesame seeds, your bread will turn out fine without them. Hope you enjoy it!
Jessica
Amazing bread! I make this every year for my Uncle's Birthday! Uncle Caputo...he is Sicilian 🙂 and he approves! Thanks for a great recipe, Nadia!
Nadia
Thank you Jessica, I'm thrilled to hear that uncle Caputo approves. Grazie!
Kathleen Duca
Terrible recipe! I followed it exactly and the results were awful. Tried one slice and threw the rest to the birds.
Nadia
I'm so sorry the recipe did not turn out to your liking Kathleen. I'm wondering if you might share more detail as to what went wrong? I try my best to help my readers, if I can, to troubleshoot when the recipe does not turn out well for them. Thank you!
Kathleen
I used a combination of AP and semolina flour. Mixed yeast with honey and warm water and let it sit. It got all foamy but my dough did not rise. It was covered and in-a warm place. I waited for a long time for it to rise. The bread came out hard as a brick.
Nadia
Thanks for your feedback Kathleen, I'm wondering if your yeast is ok as it is unusual that it did not rise at all. Did the dough come together ok when you kneaded it either by hand or with a mixer? There's no doubt using a mixer for this recipe is easier however I did test it by hand and it worked as well. I do hope you give it another chance!
Kathleen Duca
So I am trying this again. It wasn’t the yeast. It got foamy. I’m thinking my semolina flour was old. When I checked it, it smelled funny. I bought all new ingredients and I’m determined! Sorry I said it was your recipe.
Nadia
Hi Kathleen, no worries at all! I like to try and help my readers when a recipe doesn't turn out satisfactory. In can definitely be the semolina if it was old. Hope it works out next time!
Joe C.
I agree with David about old yeast and also would add that too warm a rising temperature can kill the yeast. Temperatures below 90 deg F are better for rising. I once made the mistake of trying to proof a bread loaf in a small wall oven leaving the oven lights on to provide the heat. The two halogen incandescent oven lights were too hot and the dough didn’t rise properly. I believe the yeast died.
This bread is a family favorite. I enjoy it topped with Sicilian olive oil while sipping my morning espresso. 🙂
One of my young grandsons lived with us for almost a year and now at 4 year he still says, “grandpa makes the goodest bread” referring to this semolina bread. Thanks for the recipe Nadia!
Nadia
That's so cute Joe, "goodest bread" love this one! Thank you for sharing!
David Alexander
Hello, Kathleen: I have made this bread successfully many times as written, so I am dumbfounded as to why it would not work for you. I would examine a few things: was your yeast fresh? Did you use unbleached all purpose flour, and spoon it lightly into the measuring cup, and level off? Perhaps the semolina was either too fine or too coarse. It is probably best to use a medium grind. And the water should be somewhat warm. I have only made this in a mixer as it is easiest to mix this soft dough in a mixer. It is supposed to be a soft dough. I hope you will give it another try as it is an excellent bread as others have commented. Good luck!
Nadia
Thank you David for chiming in with your experience using this recipe. What a wonderful community of readers I have, I am grateful!
Robin G
Hi, I have been in search of the best sesame semolina recipe, I am going to give this one a try. But I wanted to ask, do you think bread flour would be ok instead of AP? And do you think there's some wiggle room with the ratios? (I'd like to do a little less semolina and a little more AP or bread flour).
Nadia
Hello Robin, to tell you the truth I have not tried this recipe with bread flour. However, I don't see why it would not work well especially if bread flour adds to the chewy texture of this bread. As for ratios, I'm always open to experimenting with recipes and therefore I don't see why you could not adjust the ratios to your liking. Hope you give it a try!
David Alexander
Hi, Robin:
I have made this recipe at least 6 times, and I think it has been perfectly worked out and I hope you will give it a try as is. I have never found it necessary to play with the ratios and although I use bread flour in other recipes, I stick with unbleached all purpose flour for this recipe. You will encounter a rather soft dough, but please don't be tempted to add a lot more flour. In the end it will work out. I am not against tweaking recipes, but honestly, this recipe is already perfection, thanks to Nadia. Good luck!
Nadia
Hello David, all I can say is a huge thank you for your comment, I am flattered that you shared your experience with this delicious bread recipe! That said, I am definitely not against anyone tweaking my recipes to make them their own, I'm always open to suggestions as well. Grazie mille!
Leanne Arnold
The recipe says to mix for 8 minutes. The next sentence says "After 4-5 minutes of kneading...". Does that mean mix for 8, then use the hook and knead for an additional 4-5 min? Or is it a total of 8?
Nadia
Hello Leanne, it is in fact a total of 8 minutes. Since some readers had difficulty with the dough being too runny, I wanted to give more detail about what to expect when kneading with a dough hook. After about 4 minutes, the dough should begin wrapping itself around the hook. Hope this helps and thank you for your question!
Joe Becci
This is a great recipe. We were in Sicily this year and I came home really wanting to make the bread we ate there. We had this kind of bread growing up but we just called it Italian Bread but of course, everyone in my hometown was from Sicily. I used about 5 grams of instant yeast and skipped the proofing step, otherwise followed it exactly and it made a perfect and fast loaf!
Nadia
Hello Joe, so glad you enjoyed this recipe! I tried to recreate the delicious bread we enjoy each time we travel to Sicily, and I think this comes quite close. Thank you for sharing!
P
I added 1 cup AP flour to your recipe.
Made all the difference in creating a soft dough that rose well. And tastes great.
I’m adjusting the recipe I will keep to that equation.
Nadia
Hi, I'm glad to hear the recipe worked for you with this modification! I'm always glad to see how others modify my recipes to make them work for them. Thank you for sharing!
Dennis Silveri
Does this mean that you used 1-3/4cups of each type of flour?
If so, did you have to change the amount of water?
Thanks
Alistair
Great except for one thing: first time making it came out very, very yeasty. Second time used 1/2 the amount of yeast and it was perfect - didn't need any extra time to rise either.
Nadia
Hi Alistair, thanks for your comment. Glad you enjoyed it!
Carene
Hello! In the middle of this recipe at the moment, waiting for the dough to rise. I want to make one loaf per your instructions but another one in a cast iron dutch oven. Do you have any insight on time/temp (do I need water in a pan?) to do so? Thanks so much!
Nadia
Hello Carene, unfortunately I have not had the opportunity to try baking it in a dutch oven but I'm sure it would work. Just wondering did you try it out and if so how was it? Thanks in advance!
Carene
I actually did and it came out great! I preheated the Dutch oven with the oven and just plopped the dough in with parchment, uncovered for the same time/temp. Delicious recipe! 😊
Nadia
Thank you for your quick response Carene and thanks for sharing this technique. I'm sure my readers will find it helpful and it is definitely something I'd like to try as well. Thank you very much!